Part Two: Maintenance Issues & Information

Introduction

Maintenance issues are everyone’s concern. Keeping the building and grounds in good shape helps minimize safety risks, makes for a more pleasant living environment, and is key to keeping costs – and housing charges – under control.

Individual members are directly responsible for some maintenance issues. The Co-op as a whole is responsible for others, and external maintenance organizations assist with this work. In general, members are responsible for keeping their units clean and making sure any problems are noted and corrected. The Co-op is responsible for maintaining building exteriors and common areas. Within suites, the Co-op would be responsible for the standard appliances, and repairs to plumbing and electrical systems. For a more detailed guide to how responsibilities are allocated, take a look at the “Member Maintenance Responsibilities and Co-op Responsibilities” section below.

COHO

COHO Management Services Society (COHO) is the management services arm of the Co-operative Housing Federation of BC (of which FAAVHC is a member). COHO began offering management and consulting services to BC housing co-operatives in 1983. It operates on a not-for-profit basis, and offers maintenance assistance as well as financial and administrative management.

COHO Management offers FAAVHC and Co-op members comprehensive maintenance co-ordination; capital planning; building and unit inspections; and other services.

Work Orders

Members can submit work order requests to COHO Maintenance in one of two ways:

  • Through an on-line form (http://www.coho.bc.ca/repair); or,
  • By dropping off a paper work order in the office mailbox (#221).

A sample work order can be found in the “Forms” section of the Member’s Guide.

Submitting on-line has an advantage: you help COHO achieve its goal to become carbon neutral.

COHO is available Monday to Friday, between 9:00 am and 4:00 pm, to receive your maintenance work order requests. When they receive requests they prioritize non-emergency repairs and set a time for your service call. On the scheduled day, a COHO Maintenance Technician will carry out the necessary repairs or set up an special tradesperson for you.

It’s important for members to make arrangements to be at home at the time of the repair in order to let workers inside, or to give prior permission for staff or trades to enter your unit.

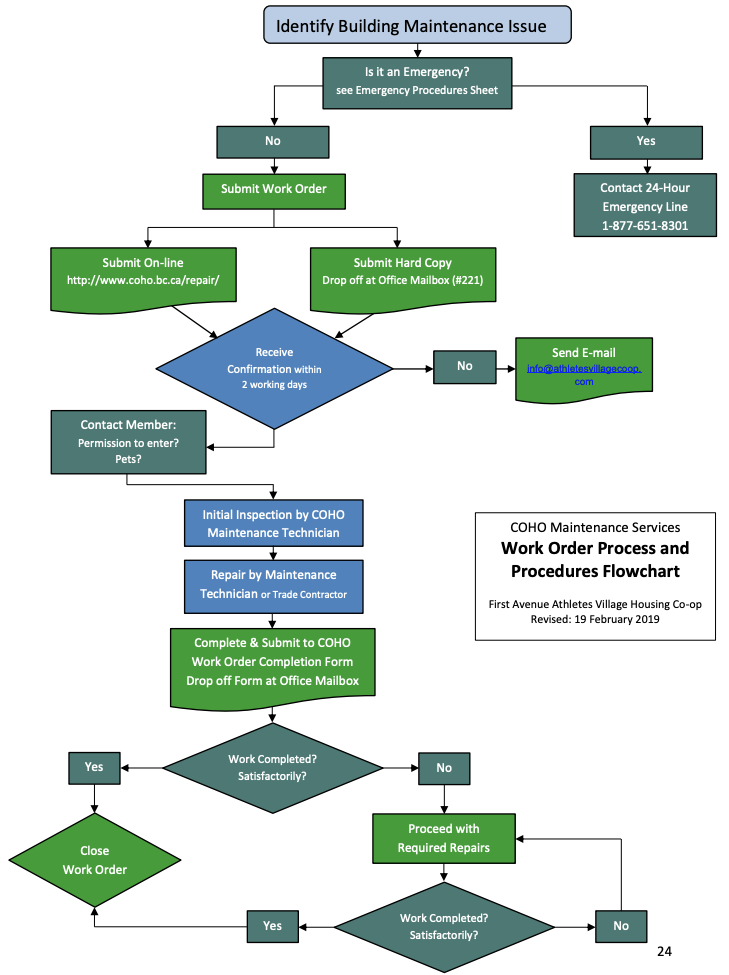
The next page shows the “Work Order Process and Procedures Flowchart”.

Screen Shot 2020-01-14 at 3.30.10 PM

Member Maintenance Responsibilities and Co-op Responsibilities


Maintenance ItemResponsibility of MemberResponsibility of Co-op
1CleaningComplete unit interiors, patios and balconies.Inaccessible exterior windows and balance of property.
2Wear, Tear and AgingExcessive wear and tear or abuse

Normal wear and tear.
Replacement of items that are a co-operative responsibility when no longer reasonably functional.

3DamageAll damages resulting from actions or negligence of Members, their family, guests or pets.

All damages resulting from a structural or maintenance deficiency that is a Co-operative responsibility.

4Property ReplacementPro-rated costs of replacement if required earlier than scheduled due to Member abuse or negligence.As per Capital Plan
5FridgeCleaning and careAll operational and function parts.
6StoveCleaning and careAll operational and function parts.
7Thermostat & BaseboardCleaning and careOperation and all maintenance
8Bulbs and lampsPurchase of all bulbs controlled by switches inside the unit

The Co-op will assist with the installation of bulbs if required and is responsible for all other bulbs not controlled by switches inside the unit.

9Fans (stove/bathroom)Cleaning and filtersMotors, impellers and wiring.
10Light FixturesGlobesOperation
11Electrical switches and receptaclesOverloading circuits and cover platesNormal operation
12BreakersOverloadingOperation
13Safety Sensors (Heat/Smoke)Ensure they are never disconnectedInspection and operation.
14Electrical wiring
Operation
15Telephone Wiring/ BoxesSet up or installation
16Water and Sanitary Pipes
Operation and leaks
17Shut-off ValveKnow location of shut-offOperation, drips and leaks
18Faucets/Shower HeadsKnow location of shut-offOperation, drips and leaks
19Sinks and TubsCare of enamel and finishesCaulking and seals
20ToiletsPlugged (overflow) and seats
Know location of shut off
Parts (excluding seats) and operation
21DrainsPlugged conditionLeaks and seals
22Exterior tap
Operations and leaks
23Doors (Interior & Exterior)Care of door knobs and doorbell buttonsHinges on all doors, weather stripping and dead bolts on exterior doors.
24Closet Doors
Hangers, guides, door and rails
25Locks and KeysAssigned keysRepair/replacement of locks when worn out.
26WindowsCleaning of interior panes, tracks and exterior accessible windowsCleaning of inaccessible exterior panes and replacement as necessary.
27Window Coverings (blinds)Excessive wear & tear or abuseReplacement per capital plan
28CarpetsStains and burns, clean regularlyReplacement per capital plan
29Linoleum/laminateStains, burns and cutsReplacement per capital plan
30Walls and CeilingsHoles, dents, scratches & scuffs
31Cupboards, Counts and ClosetsCare of hinges, scratches in counters and scuffsReplacement per capital plan
32VentingCleaning/replacement of stove vent coverInterior dryer ducting.
33Mildew/Humidity ControlAll mildew (and related damages) repairs that are not a Co-operative responsibility. Ventilation and regular cleaning is member responsibility

All mildew (and related damages) repairs, where excessive moisture can be linked to a structural or maintenance deficiency that is a Co-operative responsibility. Replace humidity control device as ecessary.

34Water DamageRepairs due to overflow, open windows or other Member negligence

Repairs due to the failure of a component that is a Co-operative responsibility

35Enclosed or private gardensMaintenance (watering, fertilizing, and weeding)Must be maintained on regular basis to keep a high level of curb appeal
36Enclosed Lawn (Grass)

Maintenance (watering, fertilizing and cutting) unless this is specifically elsewhere in Co-operative Policy or Contracts


37Patio and Stairs (External)Keep clean and free of debris, vegetation, snow and iceMaintenance as required
38Yard Fences and GatesKeep clean and free of debris and vegetationMaintenance as required
39Ceiling FansCleaning of bladesReplacement of motors
40Doorway and EntrancesKeep clean and free of debrisMaintenance as required
41Underground ParkadeMaintenance (free of oil spills, garbage, and debris)Bike racks

Information Sheets

Floor Protection and Maintenance

Moving Heavy Objects across the Floors

When moving appliances or heavy furniture it is always wise to lay a plywood panel on your floor and "walk" the item across it. This protects your floor from scuffing and tears.

Use floor protectors, such as Armstrong Floor Protectors, under furniture to reduce indentation. As a general rule, the heavier the item, the wider the floor protector needed.

Place a walk-off mat at outside entrances to reduce the amount of dirt brought into your home. We strongly recommend mats without a latex or rubber backing since these backings can cause permanent discolouration.

All Armstrong floor care products have been specifically developed to care for Armstrong floors.

Caring for Your Floor

Sweep or vacuum regularly, to remove loose dirt which can scratch your floor.

NOTE: We do not recommend vacuums that have a beater bar since it can visibly damage your flooring surface. Additionally, we do not recommend electric brooms with hard plastic bottoms with no padding as use may result in discoloration and de-glossing.

Wipe up spills as soon as possible. Never use highly abrasive scrubbing tools.

Wash your floor regularly with a vinyl floor cleaner such as Armstrong Once 'n Done Resilient & Ceramic Floor Cleaner.

Do NOT use Detergents, abrasive cleaners, or "mop and shine" products. These products may leave a dull film on your floor.

Over time, if the shine on your floor begins to dull, apply Armstrong Satinkeeper Resilient Low Gloss Floor Finish to restore the appearance of Natural Personality planks. Do NOT use paste wax or solvent-basted polishes.

Vinyl flooring, like other types of smooth floors, can become slippery when wet. Allow time for floor to dry after washing. Immediately wipe up wet areas from spills, foreign substance, or wet feet.

Floor Protectors

The Co-op strongly recommends using floor protectors on the bottom of sofas, chairs and other items of furniture to reduce the chance of sound transfer between suites, and to protect floor surfaces.

Heating and Thermostats

Heating the Co-op

Energy to heat buildings can come from a variety of sources – for example, combustion, geothermal energy or hydroelectricity. The Co-op’s flexible, radiant heating system relies on energy that largely comes from sewage.

Buildings in the Olympic Village, including FAAVHC, are connected to the Neighbourhood Energy Utility (NEU) and the False Creek Community Energy Centre, located by the southern base of the Cambie Bridge. The NEU’s facility recovers heat from untreated sewage to warm (non-sewage) water that circulates through the buildings of the Olympic Village. (During periods of peak demand, the NEU can supplement its energy base by using three high-efficiency natural gas boilers to warm the circulating water.)

Basic Explanation of the Co-op’s Temperature Control Systems

Heating is provided to your unit through capillary tube mats, which are located above the drywall in your ceiling. The mats are made of very small interconnected tubes which circulate hot water (from the NEU to control your unit’s temperature. Due to this system running through your ceilings, it is extremely important that nothing is ever screwed into your ceilings, as this can damage the system, possibly causing a leak.

Operation of Your Temperature Control Systems

In your unit, your thermostat (see figure below) is used to adjust your temperature control system. There is no switch to turn off the temperature control system. If your thermostat indicator light is red, the heating system is operating. If the indicator light is green or off, the system is not operating.
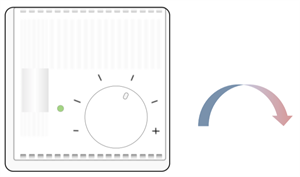
Screen Shot 2019-11-17 at 1.14.27 PMIndicator light
(red shows operation; green or no
colour shows that system is off)


Adjusting your thermostat’s control clockwise will increase your desired temperature. Once it is adjusted clockwise to the point that your indicator light turns red, your system will activate heating mode, until the temperature indicated on your thermostat is reached.

Turning the knob further in a clockwise direction will not speed up the heating process. It will only increase the temperature that your unit must reach before the heating system turns off. It is recommended to find a comfortable zone to set your temperature and make small adjustments from there.

Integrated Energy Management System

Basic Information From Enerpro Systems Corp.’s Welcome Package

Enerpro Systems Corp. was founded in 1996 and is based in Western Canada. Enerpro Systems is the market leader in advanced energy management systems. We combine technology and services to reduce energy and water consumption while reducing greenhouse gas emissions in commercial and residential buildings. We do this through an integrated energy management system called iEMS. iEMS combines specialized equipment such as digital controls, electric, water and natural gas meters with state-of-the art software.

iEMS provides increased energy efficiency and reduced costs. In addition, you manage your own costs and not the costs of your neighbours. You pay for what you consume while reducing the environmental impact of energy use. Your utilities, including hot water, cold water and heating, in the building and your suite will be measured by Enerpro Systems while providing efficient use of resources. 

Each unit has measurement devices installed to measure the consumption of hot water, cold water and heating. This consumption is specific to your own unit. If you conserve energy and water by being conscientious and aware of your consumption, you will be rewarded by paying a smaller bill than another member who does not.

The system is designed to measure all energy and water consumption within the building and your bill is calculated based on the amount you have consumed in direct proportion to the energy consumed by the building. There is no mark up on the energy. As a simple example, if the total building hot water consumption was 100 US Gallons, which equated to $100, and the consumption of unit 123 was 1 US Gallon, then the hot water invoice for Unit 123 would be $1.

Every device installed for the purposes of measuring consumption complies with various national and international standards. Enerpro Systems ensures that these devices have been tested. Enerpro Systems does not charge a mark-up on energy and water and consequently do not take a position with respect to the accuracy of the meters. It is critical that we remain impartial managers of this process. In the unlikely event that the accuracy of a meter is questioned, a dispute resolution policy is available for your review.

Account information provided is for the use of Enerpro Systems Corp. in opening an account for services. The information will not be sold or shared with third parties.

Each account will be set up in the name of the member. The member is solely responsible for all account payments. The billing cycle is every two months except if member changes within that period

Payments and Charges

Payments can be made by pre-authorized debit or by mail or at any major bank either in person or through online banking.

Account Activation fee: $20.00 (plus applicable taxes)
Late payment fee: 1.5% per month
NSF fee: $20.00 (plus applicable taxes)
Payments: Net 25 days (based on the due date shown on the invoice)

Basic Charge: $9.50 per month (plus applicable taxes). 

The basic charge covers all costs associated with three (3) meter point as well as providing data to your in suite display. Enerpro Systems’ basic charge is comparable to other utility billing providers for one (1) meter point.

Enerpro System’s Billing Contact Information

Telephone: (604) 982-9155 ext. 201
Fax: (604) 982-9166
Email: billing@enerprosystems.com
Address: 351 Bewicke Ave, North Vancouver, BC, V7M 3E9Screen Shot 2019-11-17 at 1.28.38 PM

Laundry Room Facilities


High Efficiency (HE) Laundry Appliances

High efficiency washing machines use significantly less water than traditional top-loading washing machines. Water consumption ranges between 20% and 66% of the figures reported for the older appliances. Because less water is being used, there’s less energy needed to heat that water. HE washing machines can be top-loading or front-loading. The Co-op uses front-loading machines.

HE front-loading washers need detergents that produce fewer suds than the “agitator” type machines, and that are designed to work with less water. Too much sudsing can reduce the effectiveness of the washers in getting clothes clean; they can also damage the appliances (e.g. causing the washer’s pump to overheat). Please use the correct kind of cleaning products.

Important notes about using the Co-op washers and dryers

  • The front-loading washer rotates the wet laundry with less water, so you may not even see the water during the washing
  • Do NOT overload the washers or dryers
  • Only use laundry detergent and fabric softeners that have the HE symbol on the package and must be fragrance-free, free of artificial colours, non-toxic and biodegradable
  • Do not mix powder and liquid detergents
  • Clean the lint filter before every use
  • Keep washer and dryer doors open after each use to prevent mould and mildew smell
  • Only use designated machines for items that have contaminants such as pet hairs.

Please report all issues right away to 604-879-5771 Extension 108 with the machine’s serial number (located on the front inside of the door).

Toilets and drains (A List of DOs and DON’Ts from CRS)

Do not put toilet pucks or cleaners in the back of the toilets. The water for the toilets is supplied from rain water. Water in the toilet bowl will always be somewhat coloured. The darkness on the water will depend on how much the toilets are flushed. Never allow pets or children to consume toilet water.

Keeping your drains clear and unblocked is one essential household task that we tend not to think about until it is too late and we are reaching for that plunger. There are certain things that should simply not be put down kitchen sinks, and the following list of do’s and don’ts gives an overview of the basics.
Giving a little thought before you go ahead and put anything and everything down your sink may save you a lot of drain and pipe unblocking in the not so distant future. This can be a serious and very costly fix for your co-op.

1. Don’t rinse foods down your sink unless you have an incorporated garbage disposal unit.
Vegetable peelings, pasta shells, breads and butter can form a blockage in the pipe between your sink and the outside drain. Mixing water with the food can make it particularly sticky and more liable to cling to the sides of the pipe.

2. Grease of any kind, hot or cold, clings to the inside of your pipes and causes blockages. Grease thickens very quickly when exposed to the cool pipes underneath your sink going to the outside. Grease should be left to cool and harden in an airtight container and then be disposed of in the garbage.

3. Dishwashing liquid, designed for sink use, is the only detergent you should be washing down your drain. Detergents designed for dishwashers or washing clothes will block your pipes, particularly if used in large quantities. This is because the strong agitating forces that break down these thick detergents in a dishwasher or washing machine will not be present in your sink or pipes.

4. Never pour toxic pesticides down your sink. They can congeal when mixed with cool water, forming hard deposits in the sink line, as well as eating away at the pipes and causing leaks.

5. Some people that have septic systems pour calcium chlorate down their kitchen sinks to
eliminate odour. You should always use a product that has been specially designed for sink use rather than powdered calcium chlorate. When this is mixed with water it forms a cement-like state which can easily plug your drainage system.

6. As with kitchen grease, never wash oils used for mechanics or cleaning down your sink.
Lubricating oils for joints or hinges, and motor oil are two of the major culprits. As well as
blocking your pipes, disposing of outside oils in this way is bad for the environment.
Environmental Protection Agency regulations state that it is illegal to put motor oil in anything other than a designated container.

7. Harmless looking products such as baby oil, liquid eyeliner, moisturizer and oil based soaps can all cause blockages if washed down your sink in any quantity. Play it safe and dispose of these in the garbage.

8. Hair is another common cause of blocked drains. Use a hair trap on your drains and regularly clean out the drain to ensure a blockage does not occur. Every month you should put a purposely designed drain cleaner down your pipes to make blocked drains a thing of the past.

Unit Alterations

Background

If you are thinking of making a change to your unit – particularly an alteration or addition that would require further work to undo or that isn’t easy to restore – you will need permission from the Co-op before proceeding.

The Co-op needs to maintain the integrity of the building structure and ensure that the units remain appealing to potential new members. Building regulations must also be respected. For these reasons, not all requests for changes may be approved.

The Co-op may seek the assistance of its management company when reviewing proposed alterations.

What follows are basic guidelines.

Basic/Common Alterations

Some changes are commonly made and there are already procedures in place and forms set up to handle these situations. Please look at the FORMS section if you plan to:

  • Install a dishwasher (see FORM)
  • Paint unit walls (see FORM)

Minor Alterations

  • Members may attach pictures, paintings, shelving and other objects to the unit’s interior walls. Members will be responsible for any repair or re-painting resulting from installation or removal of minor alterations or improvements, as required by the Co-op.
  • Members may not attach any object to unit ceilings.

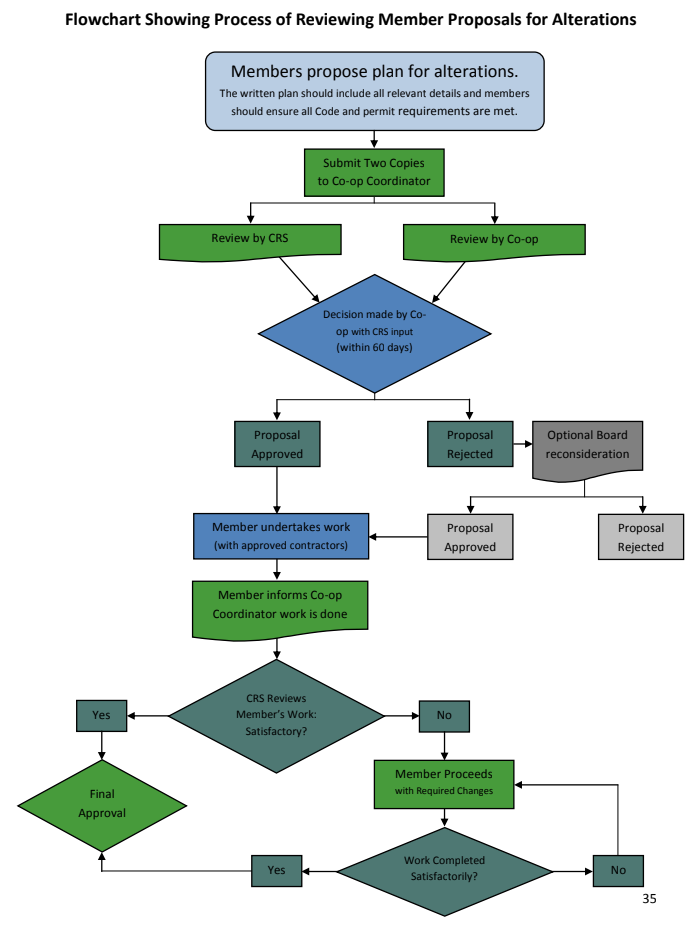
General Procedure for Making Unit Changes

Please see the Alterations Policy for more information and official rules.

The flowchart on the next page is for information only. The Alterations Policy takes priority and members should review that policy when considering any changes to their units.

Important Notes

  • Members are always responsible for ensuring that any work is carried out in compliance with City By-laws. Members should learn whether building or other permits are necessary before submitting their alteration proposal to the Co-op.
  • The Co-op will not reimburse members for alteration project expenses (materials or labour).
  • Members may be required to restore their units to the units’ original conditions before leaving the Co-op.

Flowchart Showing Process of Reviewing Member Proposals for Alterations
Screen Shot 2019-11-19 at 12.56.31 PM


Viewed 330 times